Motivation
Well, everything started with the slow death of our integrated amplifier. At first the DVD laser died because of the high temperatur inside the
device. The next step was the amplifier doing funny things. Due to this behaviour it was time to buy a new amplifier. After some research I decided
to take a NAD 7050D. The only problem was the full digital amplifier with no analog input to attach a standard FM receiver.
What should I do now? Beside the audio signal of the TV, listening to the radio was the main usage of that amplifier.
That was the first time I thought about using a Raspberry Pi with the NAD as an USB sound device. My up and running VDR server with four USB SAT receivers offers live streaming for SAT radio too and the MPD is able to listen to that. Using internet radio was out of scope due to our 1.2MBit internet down stream. My first solution with a turn and push button did not satisfy my family. I needed to offer another solution.
The new solution with a universal touch GUI. Using standard command lines was a wonderfull side effect of my idea.
Hardware
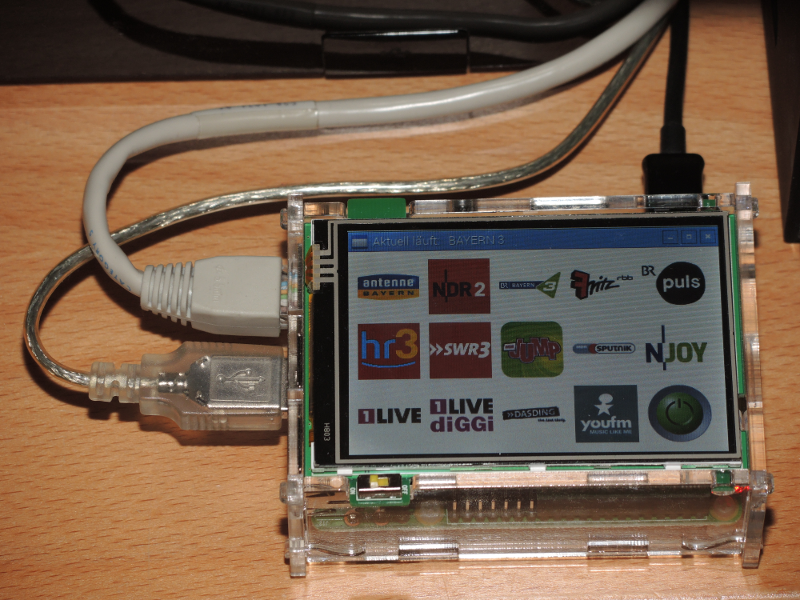
Tontec® 3.5 Zoll Raspberry Pi Touchscreen Display Monitor 480x320 LCD display with a transparent case
With this I could use three wires to attach the Raspberry Pi with no extra power supply. It is only powered when the NAD 7050D is switched on.
- 1x USB A plug to micro B plug cabel as power supply from the NAD amplifier
- 1x USB A plug to USB B plug to use the NAD amplifier as a sound device
- 1x LAN cabel to connect to the VDR server
Application
At first I put a standard, current Raspbian image to the micro SD card and did an update:
Second I enabled the SPI communication to the display. Contrary to the instruction of the vendor the current Raspbian Jessie from May 2016 already contains the correct driver.
Next step is using the touch display as main display:
The last step is to calibrate the touch sensor. In my system the following parameters are doing well. The instruction for calibration is standard and independent from the used display.
Now the Raspberry Pi should reboot and everything should run fine.
At this time it is a good idea to have a mouse attached to the Raspberry Pi. So it is easy to clean the panel entries (remove Mathematica, Wolfram and Bluetooth), enable the SSH server and disable the samba server.
The next step is the installation of the media player daemon and client
Now the playlist is to be created. In my system it contains the links to the VDR streaming server. Please replace the name of the server <server> with the name of your server.
Next step is to select the NAD as the alsa output device. To do this you have to set all audio_output areas as complete comment and to add the USB device as output at the end of the file.
With the following commands you force the daemon to reread the changed configuration. In my system Bayern3 will be played with maximum volume.
You should listen to the program of the radio station.
Now the exciting part is to come. David Hunts Projekt Lapse-Pi Touch inspired me.
He used the Python library PyGame as the GUI for his application with a touch display.
I do the same with the following Python script. I took his script and did some minor changes. At first the required libraries are imported. Then I defined some parameters for the dimensions of the display.
The major point is his class Button. It is responsible for everything important to the GUI. The method selected examines the touch activity and starts the appropriate command with the shlep function. Using the function SetCaption simplyfies my life also. The important point is the initialization of the buttons arrays. Here the position, size, the displayed picture and the callback function is defined. The size of the transparent PNG picture is 80x80 pixel.
The shlep function invokes each MPC command.
The backlight is switched on without any warning message. Then the PyGame library is initialized, the Button list is read and the mouse pointer is disabled.
To prevent any action during the lightup of the backlight, you should touch the application area with the buttons. If you hit the caption the backlight is not switched on and the application window is moved around in the darkness.
sudo apt-get update
sudo apt-get upgrade
sudo reboot
Second I enabled the SPI communication to the display. Contrary to the instruction of the vendor the current Raspbian Jessie from May 2016 already contains the correct driver.
sudo nano /boot/config.txtdtparam=spi=on
dtoverlay=mz61581
Next step is using the touch display as main display:
sudo nano /usr/share/X11/xorg.conf.d/99-fbturbo.confOption "fbdev" "/dev/fb1"
The last step is to calibrate the touch sensor. In my system the following parameters are doing well. The instruction for calibration is standard and independent from the used display.
sudo nano /usr/share/X11/xorg.conf.d/99-calibration.confSection	 "InputClass"
Identifier		"calibration"
MatchProduct		"ADS7846 Touchscreen"
Option	"Calibration"	"192 3914 251 3784"
Option	"SwapAxes"	"0"
EndSection
Now the Raspberry Pi should reboot and everything should run fine.
sudo reboot
At this time it is a good idea to have a mouse attached to the Raspberry Pi. So it is easy to clean the panel entries (remove Mathematica, Wolfram and Bluetooth), enable the SSH server and disable the samba server.
The next step is the installation of the media player daemon and client
sudo apt-get install mpd mpc
Now the playlist is to be created. In my system it contains the links to the VDR streaming server. Please replace the name of the server <server> with the name of your server.
sudo nano /var/lib/mpd/playlists/sender.m3u#EXTM3U
#EXTINF:1,Antenne Bayern
http://<server>:3000/ES/S19.2E-133-7-170
#EXTINF:2,NDR 2
http://<server>:3000/ES/S19.2E-1-1093-28437
#EXTINF:3,BAYERN 3
http://<server>:3000/ES/S19.2E-1-1093-28402
#EXTINF:4,Fritz
http://<server>:3000/ES/S19.2E-1-1093-28457
#EXTINF:5,PULS
http://<server>:3000/ES/S19.2E-1-1093-28406
#EXTINF:6,hr3
http://<server>:3000/ES/S19.2E-1-1093-28421
#EXTINF:7,SWR3
http://<server>:3000/ES/S19.2E-1-1093-28468
#EXTINF:8,MDR JUMP
http://<server>:3000/ES/S19.2E-1-1093-28432
#EXTINF:9,MDR SPUTNIK
http://<server>:3000/ES/S19.2E-1-1093-28433
#EXTINF:10,N-JOY
http://<server>:3000/ES/S19.2E-1-1093-28440
#EXTINF:11,1LIVE
http://<server>:3000/ES/S19.2E-1-1093-28475
#EXTINF:12,1LIVE diGGi
http://<server>:3000/ES/S19.2E-1-1093-28481
#EXTINF:13,DASDING
http://<server>:3000/ES/S19.2E-1-1093-28471
#EXTINF:14,YOU FM
http://<server>:3000/ES/S19.2E-1-1093-28423
Next step is to select the NAD as the alsa output device. To do this you have to set all audio_output areas as complete comment and to add the USB device as output at the end of the file.
sudo nano /etc/mpd.confaudio_output {
        type            "alsa"
        name            "NAD USB Audio"
        device          "hw:1,0"        # optional
}
With the following commands you force the daemon to reread the changed configuration. In my system Bayern3 will be played with maximum volume.
sudo service mpd restart
mpc load sender
mpc playlist
mpc play 3
You should listen to the program of the radio station.
Now the exciting part is to come. David Hunts Projekt Lapse-Pi Touch inspired me.
He used the Python library PyGame as the GUI for his application with a touch display.
I do the same with the following Python script. I took his script and did some minor changes. At first the required libraries are imported. Then I defined some parameters for the dimensions of the display.
The major point is his class Button. It is responsible for everything important to the GUI. The method selected examines the touch activity and starts the appropriate command with the shlep function. Using the function SetCaption simplyfies my life also. The important point is the initialization of the buttons arrays. Here the position, size, the displayed picture and the callback function is defined. The size of the transparent PNG picture is 80x80 pixel.
The shlep function invokes each MPC command.
The backlight is switched on without any warning message. Then the PyGame library is initialized, the Button list is read and the mouse pointer is disabled.
To prevent any action during the lightup of the backlight, you should touch the application area with the buttons. If you hit the caption the backlight is not switched on and the application window is moved around in the darkness.
Update 2021-12-18 "Rasbian OS Buster"
- shlepResult is calculated differently
- initalizing the MPD with shlep is done differently
nano /home/pi/pygameradio/pygameradio.py#!/usr/bin/python
# -*- coding: utf-8 -*-
# UI to use Icons to control MPC

import pygame, sys, shlex, time
import RPi.GPIO as GPIO
from subprocess import Popen, PIPE
from pygame.locals import *

WINDOWWIDTH  = 480 # size of window's width in pixels
WINDOWHEIGHT = 320 # size of windows' height in pixels
WINDOWBORDER = 12 # border if each button
BOTTONSIZEX  = WINDOWWIDTH/6
BOTTONSIZEY  = WINDOWHEIGHT/4
BOTTONSTEPX  = BOTTONSIZEX+WINDOWBORDER
BOTTONSTEPY  = BOTTONSIZEY+WINDOWBORDER

#            R    G    B
WHITE   = (255, 255, 255)
BGCOLOR = WHITE

BACKLIGHTTIMEOUT = 30
BacklightTimer   = BACKLIGHTTIMEOUT

# Button is a simple tappable screen region.  Each has:
#  - bounding rect ((X,Y,W,H) in pixels)
#  - background Icon, always centered
#  - single callback function
#  - string value passed to callback
# Occasionally Buttons are used as a convenience for positioning Icons
# but the taps are ignored.  Stacking order is important; when Buttons
# overlap, lowest/first Button in list takes precedence when processing
# input, and highest/last Button is drawn atop prior Button(s).  This is
# used, for example, to center an Icon by creating a passive Button the
# width of the full screen, but with other buttons left or right that
# may take input precedence (e.g. the Effect labels & buttons).
# After Icons are loaded at runtime, a pass is made through the global
# buttons[] list to assign the Icon objects (from names) to each Button.

class Button:

        def __init__(self, rect, picture, callback, command):
          self.rect     = rect                       # Bounds
          self.bg       = pygame.image.load(picture) # Background of the button
          self.callback = callback                   # Callback function
          self.cmd      = command                    # Value passed to callback

        def selected(self, pos):
          x1 = self.rect[0]
          y1 = self.rect[1]
          x2 = x1 + self.rect[2] - 1
          y2 = y1 + self.rect[3] - 1
          if ((pos[0] >= x1) and (pos[0] <= x2) and
              (pos[1] >= y1) and (pos[1] <= y2)):
            pygame.display.set_caption("")
            if self.callback:
              if self.cmd is None: self.callback()
              else:                self.callback(self.cmd)
            return True
          return False

        def draw(self, screen):
          if self.color:
            screen.fill(self.color, self.rect)
          if self.iconBg:
            screen.blit(self.iconBg.bitmap,
              (self.rect[0]+(self.rect[2]-self.iconBg.bitmap.get_width())/2,
               self.rect[1]+(self.rect[3]-self.iconBg.bitmap.get_height())/2))
          if self.iconFg:
            screen.blit(self.iconFg.bitmap,
              (self.rect[0]+(self.rect[2]-self.iconFg.bitmap.get_width())/2,
               self.rect[1]+(self.rect[3]-self.iconFg.bitmap.get_height())/2))

        def setBg(self, name):
          if name is None:
            self.iconBg = None
          else:
            for i in icons:
              if name == i.name:
                self.iconBg = i
                break

def shlep(cmd):
    '''shlex split and popen
    '''
    parsed_cmd = shlex.split("/bin/bash -c '" + cmd + "'")
    proc = Popen(parsed_cmd, stdout=PIPE, stderr=PIPE)
    out, err = proc.communicate()
    return (proc.returncode, out, err)

def SetCaption():
    shlepResult = shlep('mpc | head -n 1 | cut -d\: -f1')
    sender = shlepResult[1].rstrip('\n')
    if sender[:6] == "volume":
        pygame.display.set_caption("Aus")
    else:
        pygame.display.set_caption("Aktuell läuft:   " + sender)

buttons = [
    Button((WINDOWBORDER,                 WINDOWBORDER,                 BOTTONSIZEX, BOTTONSIZEY), '/home/pi/pygameradio/antenne.png',     shlep, 'mpc play 1'),
    Button((WINDOWBORDER+BOTTONSTEPX,     WINDOWBORDER,                 BOTTONSIZEX, BOTTONSIZEY), '/home/pi/pygameradio/ndr2.png',        shlep, 'mpc play 2'),
    Button((WINDOWBORDER+(2*BOTTONSTEPX), WINDOWBORDER,                 BOTTONSIZEX, BOTTONSIZEY), '/home/pi/pygameradio/bayern3.png',     shlep, 'mpc play 3'),
    Button((WINDOWBORDER+(3*BOTTONSTEPX), WINDOWBORDER,                 BOTTONSIZEX, BOTTONSIZEY), '/home/pi/pygameradio/fritz.png',       shlep, 'mpc play 4'),
    Button((WINDOWBORDER+(4*BOTTONSTEPX), WINDOWBORDER,                 BOTTONSIZEX, BOTTONSIZEY), '/home/pi/pygameradio/puls.png',        shlep, 'mpc play 5'),
    Button((WINDOWBORDER,                 WINDOWBORDER+BOTTONSTEPY,     BOTTONSIZEX, BOTTONSIZEY), '/home/pi/pygameradio/hr3.png',         shlep, 'mpc play 6'),
    Button((WINDOWBORDER+BOTTONSTEPX,     WINDOWBORDER+BOTTONSTEPY,     BOTTONSIZEX, BOTTONSIZEY), '/home/pi/pygameradio/swr3.png',        shlep, 'mpc play 7'),
    Button((WINDOWBORDER+(2*BOTTONSTEPX), WINDOWBORDER+BOTTONSTEPY,     BOTTONSIZEX, BOTTONSIZEY), '/home/pi/pygameradio/jump.png',        shlep, 'mpc play 8'),
    Button((WINDOWBORDER+(3*BOTTONSTEPX), WINDOWBORDER+BOTTONSTEPY,     BOTTONSIZEX, BOTTONSIZEY), '/home/pi/pygameradio/sputnik.png',     shlep, 'mpc play 9'),
    Button((WINDOWBORDER+(4*BOTTONSTEPX), WINDOWBORDER+BOTTONSTEPY,     BOTTONSIZEX, BOTTONSIZEY), '/home/pi/pygameradio/n-joy.png',       shlep, 'mpc play 10'),
    Button((WINDOWBORDER,                 WINDOWBORDER+(2*BOTTONSTEPY), BOTTONSIZEX, BOTTONSIZEY), '/home/pi/pygameradio/1live.png',       shlep, 'mpc play 11'),
    Button((WINDOWBORDER+BOTTONSTEPX,     WINDOWBORDER+(2*BOTTONSTEPY), BOTTONSIZEX, BOTTONSIZEY), '/home/pi/pygameradio/1live-diggi.png', shlep, 'mpc play 12'),
    Button((WINDOWBORDER+(2*BOTTONSTEPX), WINDOWBORDER+(2*BOTTONSTEPY), BOTTONSIZEX, BOTTONSIZEY), '/home/pi/pygameradio/dasding.png',     shlep, 'mpc play 13'),
    Button((WINDOWBORDER+(3*BOTTONSTEPX), WINDOWBORDER+(2*BOTTONSTEPY), BOTTONSIZEX, BOTTONSIZEY), '/home/pi/pygameradio/youfm.png',       shlep, 'mpc play 14'),
    Button((WINDOWBORDER+(4*BOTTONSTEPX), WINDOWBORDER+(2*BOTTONSTEPY), BOTTONSIZEX, BOTTONSIZEY), '/home/pi/pygameradio/schalter.png',    shlep, 'mpc stop')
]

# Initalize the MPD
shlep('sleep 2; mpc stop; mpc clear; mpc load sender; sleep 2; mpc play 3')
GPIO.setwarnings(False)
GPIO.setmode(GPIO.BCM)
GPIO.setup(18,GPIO.OUT)

pygame.init()
DISPLAYSURF = pygame.display.set_mode((WINDOWWIDTH, WINDOWHEIGHT))
DISPLAYSURF.fill(BGCOLOR)
for item in buttons:
    DISPLAYSURF.blit(item.bg,(item.rect[0],item.rect[1]))
pygame.mouse.set_visible(False)
pygame.display.update()
SetCaption()

while True: # main game loop
    for event in pygame.event.get():
        if(event.type is MOUSEBUTTONDOWN):
          if BacklightTimer < 0:
            BacklightTimer = BACKLIGHTTIMEOUT
            # Backlight on
            GPIO.output(18,0)
          else:
            pos = pygame.mouse.get_pos()
            for b in buttons:
              if b.selected(pos):
                BacklightTimer = BACKLIGHTTIMEOUT
                SetCaption()
                break
        if event.type == QUIT:
            pygame.quit()
            sys.exit()
    if BacklightTimer > 0:
      BacklightTimer = BacklightTimer -1
    elif BacklightTimer == 0:
      BacklightTimer = -1
      # Backlight off
      GPIO.output(18,1)
    time.sleep(1)
Next thing is to start the GUI of the radio at power up. To do this you add a line to the autostart file.
Update 2021-12-18 "Rasbian OS Buster"
- autostart is done differently
sudo nano /etc/xdg/autostart/piradio.desktop[Desktop Entry]
Type=Application
Name=PiRadio
Comment=Touch Radio
NoDisplay=true
Exec=/usr/bin/python /home/pi/pygameradio/pygameradio.py
NotShowIn=GNOME;KDE;XFCE;
With another reboot everything should work as expected.
sudo reboot
If somebody has an idea to my SAT radio with touch GUI, an eMail is a proper way to contact me.
I appreciate any eMail that states a successfull reproduction to me.
Now I'd like to wish you good luck!